This article will tackle all of the advanced settings available in the most current version of Datasync.
- Trim Whitespace
- Has Header Row
- Set Aside Errors
- Map fields
- Manage Synthetic Location Columns
- Advanced Import Options
Trim Whitespace
The first two options you’ll see are Trim Whitespace and Has Header Row. Both of these options are selected by default. It is best practice to always keep Trim Whitespace selected since this option means that any extra spaces before or after fields in your data will be stripped. (This reduces excess variability and makes sure that any users making API calls don’t have trouble when parsing the data.)
(**If you use Unique Identifiers to make row-specific updates, then be careful and make sure you don't have whitespace in your Unique IDs when the data is initially uploaded. If the whitespace makes it into the Data & Insights dataset, DataSync will not be able to match the trimmed version to the original non-trimmed version.)
Has Header Row
You may want to de-select ‘Has header row’ if your CSV or TSV does not contain headers. You will then need to map the columns correctly to their respective API field names using the Map Fields option. When ‘Has header row’ is de-selected the CSV Field section will list each column and include a sample of the column data. This way, you can be sure that your data from your CSV is being mapped to the correct column in your dataset.

Set Aside Errors
By checking Set Aside Errors, if there are specific rows in your update that error out this will generate a download link for a CSV of the specific rows that failed in the Jobs Status page. This option will be unchecked by default.

Map fields
The Map Fields section allows you to be sure that each column in your CSV or TSV file is being matched to the correct column in your Data & Insights dataset. When you click on the Map Fields button, a new window appears that will show you a list of the column headers in your CSV or TSV and it will try to guess how you would like those columns matched to the columns in your dataset. If you need to re-map the columns or ignore a column, you can do so by using that column’s corresponding drop down menu.

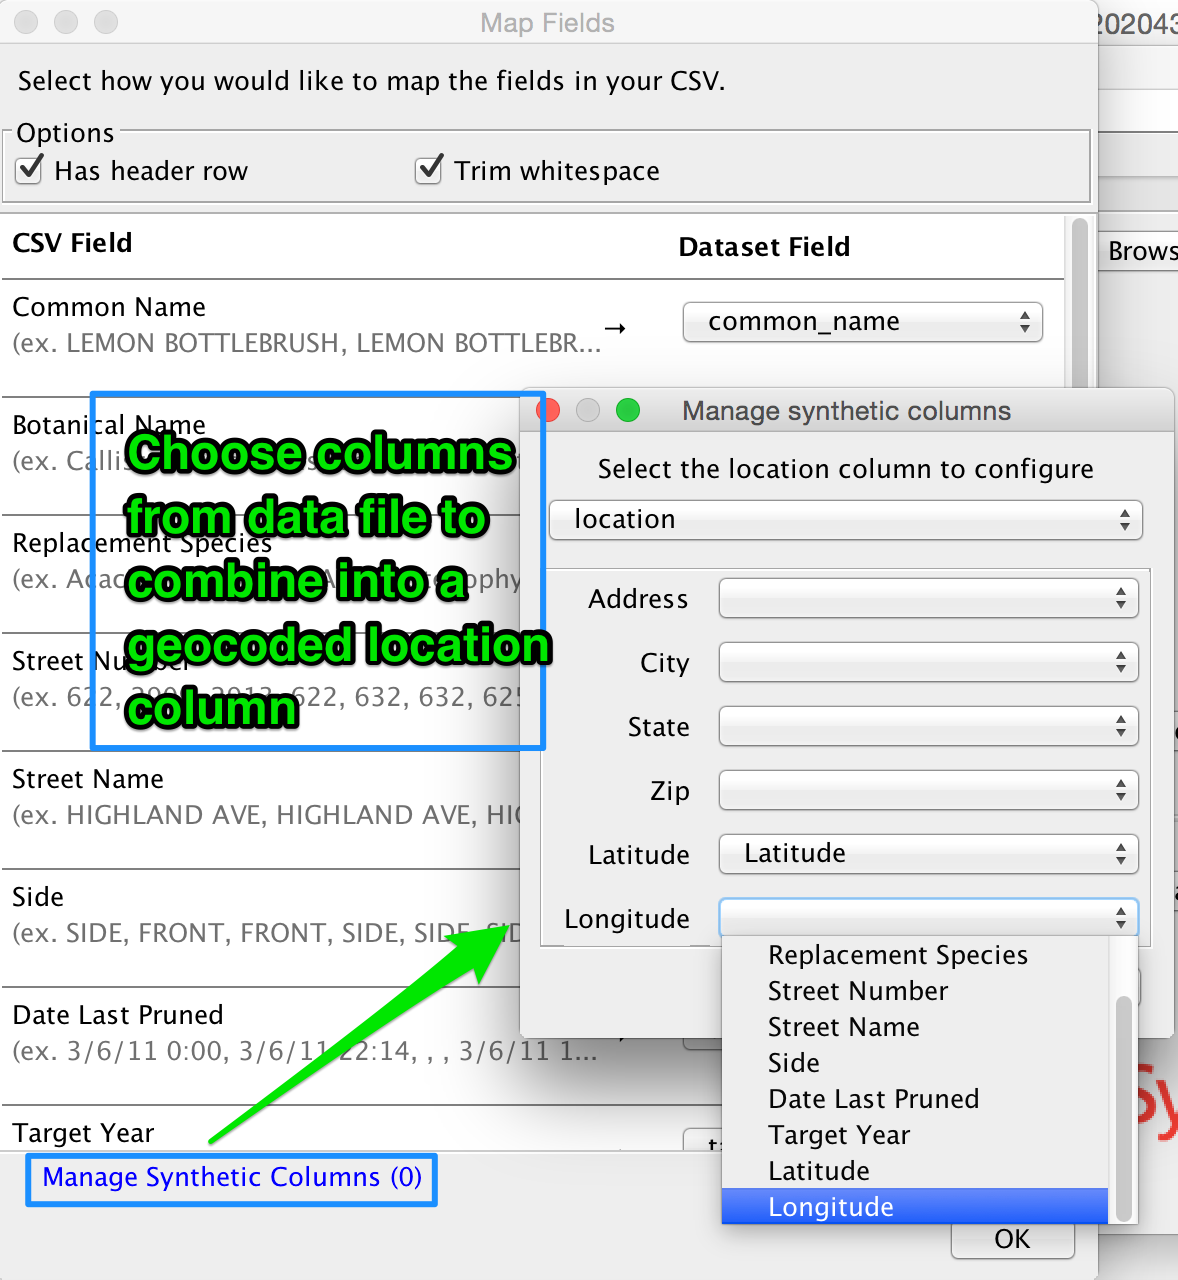
Manage Synthetic Location Columns
If you have a geocoded location column in your Data & Insights dataset, DataSync will give you an option to Manage Synthetic Columns which will appear at the bottom of the Map Fields window. To create a synthetic location, you will need to be sure you have the correct data:
- U.S. street address AND Zip Code (must be accompanied with one of the following to accurately geocode)
- Zip Code (can be geocoded individually)
- City (must be accompanied by at least the zip code or state)
- State (can be geocoded individually)
- Latitude and Longitude (can be included in individual columns or a single column)
- If you have one of the above combinations of data, you can click on the Manage Synthetic Columns option, then you can select the location column from your dataset that you’d like to configure. Then using the drop-down menus, select the columns from your CSV or TSV that you’d like to combine to create the geocoded location column.
Please note that you will need to configure the synthetic location in DataSync in the same way your Data & Insights dataset is configured. For example if your CSV or TSV contains a latitude and a longitude, but your Data & Insights dataset only contains a geocoded location column, 1) you’ll need to set up your synthetic location column AND 2) ignore the columns that are not included in your Data & Insights dataset from the drop-down menus in the Map Fields window.
Advanced Import Options
Timestamp format
DataSync uses JODA timestamp format to import your date and time columns correctly from your data file into your Data & Insights dataset. The default timestamp settings are currently: ISO8601,MM/dd/yy,MM/dd/yyyy,dd-MMM-yyyy,MM/dd/yyyy HH:mm:ss a Z,MM/dd/yyyy hh:mm:ss a.
Please note that it the different time and date formats should be comma-separated but there should not be spaces between the entries.
The timestamp in your data file needs to match one of the formats listed in that field. If the timestamp in your data file does not match one of these options, you can simply type in the correct format, separated from the previous formats with a comma. The acceptable characters are listed in JODA's documentation. Typical characters used are:
M=month
d=day
y=year
H=hour 0-23
h=hour 1-12
m=minute
s=second
a=AM/PM
Z=timezone
For example:
If your date/time reads 07/31/14 the corresponding JODA format would be MM/dd/yy
If your date/time reads 07/31/2014 01:52:33 AM the corresponding JODA format would be MM/dd/yyyy hh:mm:ss a (12 hour day with am/pm designation).
If your date/time reads 07/31/2014 01:52:33 the corresponding JODA format would be MM/dd/yyyy HH:mm:ss (24 hour day, no am/pm character needed).
If your date/time reads 31/07/14 the corresponding JODA format would be dd/MM/yy (note the days come before the month, a commonly used format internationally)
If your date/time reads July 07, 2014 the corresponding JODA format would be MMMM dd/, yyyy (note that a backslash is added before the comma so that it's not used as a format entry separator)
Separator
A separator is whatever character is used to separate the different fields in your data file. If your data file is a CSV, this will most likely be a comma (,). If your data file is a TSV, this will be a tab stop character (/t). When you add your file to the DataSync user interface, it will read the file extension and include the default separator for whichever file type you’re using. If for some reason your file uses an alternate separator character (for example, a semi-colon), you’ll need to change this field to represent whichever separator is used in your file.
Quote
This character is used to quote values which contain the separator character. Separators between quotes will be treated as part of the value. Typical values are "\"" for double-quotes, "'" for single-quotes and "\u0000" for no quote character.
Encoding
By default, DataSync uses utf-8 encoding to read data. This format is compatible with nearly all data, but there are many other acceptable encoding formats, which can be found here.
Rows to skip
The default setting will be to skip 1 row of data because the first row of data will normally be the column header. If you do not have a header row, 1) you will need to de-select 'Has header row', and 2) change the number of rows to skip to 0.
Escape
This is used to specify the escape character. The default setting will be to leave this field blank. If your data uses an escape character, this will typically be "\\", a single backslash.
Timezone
The default timezone will be UTC, but you can change this setting to specify the timezone according to the formats listed here: http://joda-time.sourceforge.net/timezones.html. This setting will only have an effect on Date & Time (with timezone) columns.
**Please note that you should not use the 3-letter abbreviations (ie: MST which can mean Mountain Standard Time or Malaysia Standard Time)
Empty Text is Null
This should be kept as the default with the box checked. If this is unchecked, every empty string will be viewed as a change to your dataset, slowing down the upsert time considerably.
Use Data & Insights Geocoding
This setting is only relevant if your dataset contains a location column. If you are not providing the latitude and longitude in the synthetic location (for example, you provide a U.S. street address and a city), check the box. If you are providing the latitude and longitude in the synthetic location, uncheck the box.
Comments
Article is closed for comments.