Citizen Connect allows data to be filtered by region or district and offers a clickable map of those districts to make navigation more straightforward. This is done through the use of shapefiles, that can be used as custom boundaries in Citizen Connect. Examples of this maybe neighborhoods, council district, or police beats.
If you already have the spatial lens enabled on your domain, its ready for use in Citizen Connect!
The following article will detail the process of adding a new shape dataset into Citizen Connect.
Uploading your Shapefile Dataset
Site administrators have the option to upload a geospatial file or create a spatial lens boundary based on an existing geospatial map on the platform.
Uploading a new geospatial file: Upload the geospatial file through the dataset publishing interface, a process which is detailed here. The geospatial file must meet the following criteria:
- Can be KML, KMZ, Shapefile or Geojson
- Must be a single layer map that contains polygons or multipolygons
- Should contain a label for each boundary in the map
Creating the Spatial Lens
Once the geospatial file has been uploaded to your Data & Insights site, you are ready to start configuring it for Spatial Lens. You’ll need an Administrator role to use the Spatial Lens configuration Panel.
1. Navigate to Spatial Lens from the Admin panel on your domain.
2. Click "Add New Boundary" to open the Spatial Lens picker. In this dialog box, find the boundary map and click "Choose".
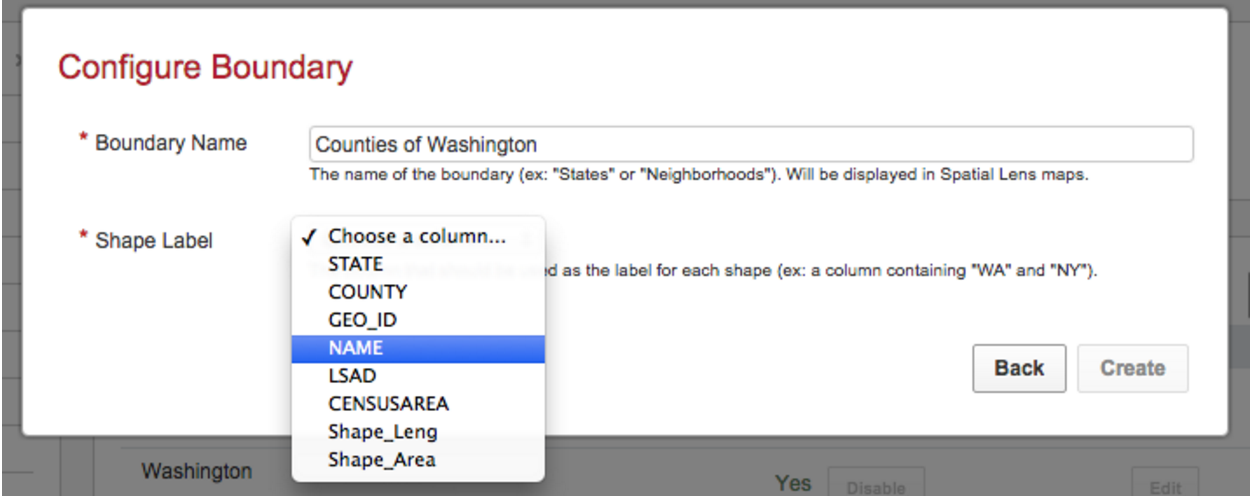
3. Give your Spatial Lens boundary a name and pick the column that should represent the label for the shapes. By default the Boundary Name is the Dataset Title, this can be edited.
Note: The Boundary Name is in the title of the Choropleth when added to a Data Lens page, so it is important that this name is human readable and will allow users to identify area and regions that the map represents.
If needed, this Boundary name & the label column that you choose can be changed later. A Boundary Name can only be used one time on a domain, and Boundaries cannot be otherwise edited.
Note: If your Spatial Lens doesn’t appear on the list or you see an error message that “Something went wrong…,” please contact Data & Insights Support with error message code, and/or a screenshot of the error, along with your domain url and the link to the boundary map that you were trying to configure.
Adding the Shape Dataset in Citizen Connect
Now that you have created your spatial lens, you can use the data in Citizen Connect. The first step here will be to log in to the admin panel at admin.finance.socrata.com. To add the Shapes Dataset navigate to Dataset Settings > Shapes Dataset. Next, click on the + button to Add a Shape Dataset.
Now enter your dataset domain where your data is hosted. The Dataset ID button will have a drop-down where you can select your preconfigured spatial lens.
Once you have selected your Dataset, the next three boxes for Shape ID, Shape, and Name will generate automatically. From here you just need set your shape text and description with columns from the shapefile. Once done, save your changes.
Add Computed Columns to the Tickets Dataset
The final piece of this puzzle will be to add a computed column for the new shapefile to any tickets dataset you are already using in Citizen Connect.
To do so go to Dataset Settings > Tickets Dataset. In the section marked "Spatial Lens", click the Generate button which will create the computed column on the dataset. Make sure to add appsteam@socrata.com as publisher in your data domain in order to create the computed columns.
Sit back and relax, it can take some time for this process to complete, based on the size of the tickets dataset. Once the computed column is done generating, use the drop-down to select the appropriate column. The 4x4 at the end computed column name will match that of the spatial lens.
After saving your changes, your new shape is now ready for use in Citizen Connect! You can also go into Shapes Descriptions in the admin panel to keep filling out detail on your new shapefile.
Comments
Article is closed for comments.